Managing data workflows can be complex but deploying them shouldn’t be. At our organization, we rely on Apache Airflow to orchestrate critical tasks. To ensure our deployments are fast, reliable, and consistent, we’ve built a fully automated CI/CD (Continuous Integration/Continuous Delivery) pipeline. This post will walk you through our entire process, from a developer committing code to a DAG running live in production. If you’re new to the team or just curious about modern data engineering practices, this is for you!
The Big Picture: An Assembly Line for Your Code
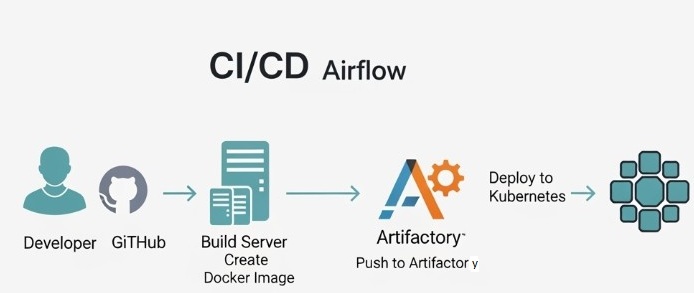
Think of our deployment process as an automated assembly line. A developer writes the instructions (an Airflow DAG), and the CI/CD pipeline takes care of building, packaging, and deploying it without any manual intervention.
The entire flow looks like this:
Developer → GitHub → CI/CD Automation → Docker Image → Artifactory → Kubernetes
Here’s the diagram illustrating the workflow:
First, A Quick Refresher on Airflow Components
Before we dive into the pipeline, let’s briefly touch on the key parts of an Airflow environment running on Kubernetes:
Scheduler: This is the mastermind. It monitors all your DAGs and triggers tasks when their dependencies and schedules are met.
- Webserver: This provides the user interface you use to monitor DAG runs, check logs, and manage your workflows.
- Worker: These are the workhorses that actually execute the commands defined in your tasks.
- DAGs Folder: A shared location where the Scheduler and Workers can access your Python DAG files to know what they need to run.
Our CI/CD process is designed to get your code into that DAGs Folder in a safe and automated way.
The CI/CD Pipeline: A Step-by-Step Journey
So, what happens when you finish writing your new DAG and run git push?
Step 1: Code and Push to GitHub
This is where it all begins. As a developer, you create or modify a DAG file in Python. Once you’re ready, you commit your changes and push them to our central GitHub repository. This push event is the trigger that kicks the entire automated pipeline into gear.
Step 2: Continuous Integration (CI) – Building the Docker Image
Once GitHub receives the new code, our CI system (GitHub Actions) gets to work. Its primary job is to package your code for deployment.
It does this by building a Docker image. A Dockerfile in our repository acts as a recipe. It instructs the build server to:
- Start with a base Apache Airflow image.
- Copy all of our custom DAGs (including your new one) directly into the image.
This creates a self-contained, portable package that includes Airflow and all our specific workflows. This process of “baking” the DAGs into the image is key to ensuring consistency between our development and production environments. We can also run automated tests at this stage to catch any syntax errors or import issues before the code ever gets near production.
Step 3: Continuous Delivery (CD) – Storing and Deploying
With a new, validated Docker image in hand, the pipeline moves on to the delivery phase.
- Push to Artifactory: The pipeline pushes the newly created Docker image to Artifactory, our artifact repository. Think of Artifactory as a private library for all our application packages. Each image is given a unique version tag, so we have a complete history and can easily roll back if needed.
- Deploy to Kubernetes: This is the final, magic step. The pipeline instructs our Kubernetes cluster to update the running Airflow application. It tells Kubernetes, “Please deploy this new version of the Airflow image from Artifactory.”
Kubernetes handles this with a rolling update, gracefully replacing the old running Airflow components (Scheduler, Webserver, etc.) with the new ones. This ensures zero downtime. Once the new pods are running, the Airflow Scheduler automatically picks up your new or updated DAG, and it’s officially live!
Why We Love This Approach
Automating our Airflow deployments this way provides several huge benefits:
- Speed: Developers can get their code into production in minutes, not hours or days.
- Reliability: Automation eliminates manual errors. Every deployment follows the exact same tested process.
- Consistency: Every DAG is deployed in the same way, inside the same Docker image, ensuring what works on a developer’s machine will work in production.
- Traceability: We have a clear history of every deployment linked directly to a specific code commit in GitHub.
And that’s it! By connecting these powerful tools, we’ve created a robust, efficient, and developer-friendly workflow for managing our most critical data pipelines.